"Sometimes I wonder about my life. I lead a small life - well, valuable, but small - and sometimes I wonder, do I do it because I like it, or because I haven't been brave?" - Kathleen Kelly (You've Got Mail)

Tuesday, November 20, 2012

Raspberry White Chocolate Scones

 
In all my years of baking, I've never made scones! They're one of my favorite pastries but I never got up the nerve to make them before. They seemed too messy and complicated. I finally sucked it up and gave them a try. They were indeed messy. But not complicated at all! AND they turned out amazing! I'm already making another batch today for some friends :)
 
 
Raspberry White Chocolate Scones

Ingredients:
1/2 c. milk
1/2 c. sour cream
2 c. all-purpose flour
1/2 c. white sugar
2 tsp. baking powder
1/4 tsp. baking soda
1/2 tsp. salt
1/2 c. cold butter, diced
1 c. frozen raspberries*
1/2 c. white chocolate chips
1 tbsp. butter, melted
Sugar for sprinkling
 
Directions:
Whisk together the milk and sour cream and refrigerate until needed. Stir together the flour, sugar, baking powder, baking soda and salt in a medium or large bowl. Add the diced, cold butter to the flour mixture. Using a pastry blender, cut in the butter until the size of small peas. Add the milk mixture and fold with a spatula until just combined.
Place the dough onto a liberally floured work surface (this is where it gets messy!). Using floured hands, dust the dough with flour and knead 6-8 times, until it holds together in a ball. Add flour as needed to prevent sticking.
Using a floured rolling pin, roll the dough into an approximate 12-inch square. Fold dough into thirds, like a letter, using a spatula to release dough if it sticks to the counter top. Lift short ends of dough and fold into thirds again to form an approximate 4-inch square. Roll into a 12 inch square again. Sprinkle raspberries and white chocolate evenly over surface of the dough. Using a spatula, loosen the dough from the work surface and roll up tightly into a log. Place seam side down and press log into a 12 by 4-inch rectangle. Using a sharp, floured knife, slice rectangle into 4 equal rectangles. Cut each rectangle diagonally to form 2 triangles. Transfer to baking sheet. Brush with melted butter and sprinkle with sugar.
Bake in the preheated oven for 18-24 minutes. Transfer to cooling racks and let cool at least 10 minutes before serving. Makes 8 large scones.
 
Recipe found here
 
 
*I like to use frozen raspberries and break them into small pieces before adding them to the dough. It disburses them more evenly and you don't get big mouthfuls of raspberries when you bite into the scone.
 

Chewy Chocolate Almond Cookies (gluten-free)


It's been a while, guys! Life is very full (in a good way) and I just haven't had the time to sit and update my little blog. Honestly, I've been thinking about deleting it all together...we'll see. Anyways, I've been cooking and baking like crazy, as well as doing tons of house and craft projects but these cookies were just too good not to share! Even if you don't do the gluten free thing, these are definitely worth a try. Probably in my top 5 favorite cookies. The flavor and texture are out of this world!


Chewy Chocolate Almond Cookies

Ingredients:
8 oz. semi sweet chocolate, coarsely chopped
3 tbsp. butter, softened
2 eggs
1/3 c. white sugar, plus additional for rilling
1/2 tsp. almond extract
3/4 c. finely ground almonds

Directions:
Melt the chocolate in a glass bowl in the microwave, 30 seconds at a time, stirring in between. Once melted, stir in the butter until thoroughly combined. Using a mixer, beat the eggs, sugar and almond extract until light and frothy, about 60 seconds. Fold the egg mixture into the the chocolate, then fold in the ground almonds.
Cover and refrigerate for at least 4 hours, or overnight. When ready to bake, preheat oven to 350 and line 2 baking sheets with parchment. Using a 1 tablespoon cookie scoop, portion out dough balls and roll in sugar. Place on prepared baking sheets and bake in the preheated oven for 10-12 minutes, just until cookies are set. Allow to cool on baking sheets for 5 minutes and then transfer to cooling rack to cool completely. Makes 2 dozen cookies.


Recipe adapted from here

Wednesday, August 22, 2012

Toasted Coconut Rice Krispie Treats


Oh my gosh...these are like a little piece of heaven in your mouth! So simple, yet so delicious! I love rice krispie treats and a looooove coconut so I knew I couldn't go wrong mixing the two together. I may or may not have eaten these for breakfast today ;)


Toasted Coconut Rice Krispie Treats

Ingredients:
3 tbsp. butter
10 oz. bag mini marshmallows
1 1/2 c. toasted shredded sweetened coconut*, divided
1 1/4 tsp. coconut extract
5 c. Rice Krispies cereal
Directions:
Generously spray a 13x9 pan with cooking spray and set aside.  In a large saucepan, melt the butter over medium/low heat. Add marshmallows and stir until completely melted. Stir in half the toasted coconut (3/4 cup) and the coconut extract. Remove from heat and stir in the cereal until well combined. Spoon into the prepared pan and press down with your fingers (it helps if you put a little cold water on your finger tips to prevent sticking). Sprinkle the remaining 3/4 cup of toasted coconut on top and press lightly. Allow to cool at least 30 minutes before cutting and severing.

*To toast coconut, heat a skillet over medium heat (no oil needed) and add coconut. Stir constantly until lightly browned and crunchy, about 5 minutes.

Tuesday, August 21, 2012

Healthier Sesame Chicken


Here's yet another photo my hubby snapped on his iPhone at the dinner table. I've been too lazy to get my camera out I guess! This recipe is from my friend Jessy's blog. I've had it saved all year and finally got around to making it this week! Mine didn't turn out nearly as pretty as hers but it sure did taste amazing. And it was SO easy! I usually shy away from making Asian dishes at home because they usually involve many steps and a deep fryer. This didn't require either. We'll definitely eat this again!


Healthier Sesame Chicken
Ingredients:
1/2 c. all purpose flour
1/4 tsp. salt
1/4 tsp. black pepper
4 boneless skinless chicken breast halves, cut into bite-sized pieces
1/4 c. reduced sodium soy sauce
1/4 c. white sugar
1/2 tsp. sesame oil
1 tbsp. sesame seeds
1/4 c. chopped scallions

Directions:
In a gallon size Ziploc bag, combine flour, salt and pepper. Add chicken to the bag, seal and shake well to coat. Generously spray a large skillet with non stick cooking spray and heat to medium-high heat. Add chicken to the hot skillet and cook, stirring occasionally for 4-5 minutes, until no longer pink. Transfer to a plate.
Reduce heat to medium and add soy sauce and sugar to the skillet. Stir until the sugar dissolves, about 1-2 minutes. Stir in the sesame oil and sesame seeds. Finally, add chicken and scallions. Toss and serve immediately over hot, steamed brown rice. Makes 4 servings.

Tuesday, August 14, 2012

Raspberry Almond Bars - take 1


I say "take 1" because I have a pile of raspberry almond bars/tarts/cakes etc. that I'll be trying out over the next several weeks to determine which recipe is best. Then I'll make my favorite for a big event I'm baking for in September.

This one turned out well. I don't have anything to compare it to though since it's the first! But it was really easy to make and they don't seem dry (something I'm trying to avoid). I'm feeding these to a group of ladies this evening...so we'll see if they go over well!


Raspberry Almond Bars

Ingredients:
2 c. white flour
1/4 tsp. baking soda
1/2 tsp salt
3/4 c. butter, softened
1 c. sugar
1 egg
2 tsp. almond extract
10 oz. raspberry preserves
1/2-3/4 c. sliced almonds

Directions:
Preheat oven to 350 and grease a 13x9 pan and set aside. Sift together flour, baking soda and salt in a medium bowl and set aside. In a large bowl, cream together butter and sugar until light and fluffy, about 1 minute on medium speed. Beat in the egg and almond extract. Next, slowly add the flour mixture until well combined. Press the dough into the prepared baking pan and spread evenly with raspberry preserves. Sprinkle with the sliced almonds and bake in the preheated oven for 30-35 minutes, until dough is set. Cool completely, cut into squares and serve.

Wednesday, August 8, 2012

Mango Coconut Sorbet


Wow! This post is long overdue! So sorry for how dead it's been around here. We're still busy busy getting our house in order....I'll have some room reveal posts soon! Over the last couple weeks I redid our laundry room, Amelia's room and put some finishing touches on Margot's room. It's looking and feeling great!

I really wanted to take a moment and share this sorbet recipe with you. It's just too good not to! I made this for my family earlier this week and it was consumed immediately! Everyone raved about it. Even a couple people who don't care for either flavors loved it. Mango and coconut are two of my favorite things to eat so I was super excited to make this! It met all my expectations and then some! I can't wait to make it again. Someone snapped this photo and posted it on Instagram. I borrowed it since it was the only one taken :)


Mango Coconut Sorbet

Ingredients:
3/4 c. white sugar
1/4 c. water
2 c. peeled and cubed ripe mango
13.5 oz. can coconut milk
1 tbsp. fresh lime juice
1.5 tsp. coconut extract
1/2 c. flaked coconut, toasted*

Directions:
In a small saucepan over med/low heat, combine the water and sugar and stir occasionally until sugar is completely dissolved. Remove from heat. Next, place the mango cubes, coconut milk, lime juice and coconut extract into a blender and pulse until smooth. Add the sugar water and pulse a few more times until well combined. Place mixture into a container with a lid and refrigerate until chilled, at least 3 hours. Once mixture is chilled, place in your ice cream maker and freeze to soft serve consistency. Transfer to a freezer container with lid and freeze 2-3 hours, until firm. Serve topped with toasted coconut*. Makes 6 servings.

*To toast coconut, heat a large skillet over med/high heat (no oil needed) and add coconut. Stir constantly until lightly browned and crunchy, about 5 minutes. Cool and serve.

Thursday, July 5, 2012

Cake Batter Cookies


I've seen lots of recipes for these cookies floating around blogs and Pinterest and I finally decided to give them a try. It's probably a really bad thing that I did! They were SO easy to make and SO delicious! And the flavor combos are endless...chocolate cake mix with peanut butter chips, lemon cake mix with poppy seeds, vanilla cake mix with chocolate chips, etc. etc.
I made these for 4th of July and slapped some vanilla frosting and a scoop of vanilla ice cream between a two cookies and made sandwiches out of them. They are the perfect cookie for making sandwiches because they're extremely moist and chewy but hold they're shape well.


Cake Batter Cookies

Ingredients:
18.25 oz. vanilla cake mix
1 tsp. baking powder
2 eggs
1/2 c. vegetable oil
1 tsp. vanilla
1/2 c. colored sprinkles

Directions:
Preheat oven to 350, grease a couple of cookie sheets and set aside. In a large mixing bowl, mix together the cake mix, baking powder, eggs, oil and vanilla on medium speed, just until combined, about 30 seconds. Stir in the sprinkles. Drop by rounded spoonfuls onto prepared cookie sheets and bake in the preheated oven for 9-11 minutes. They will be very soft, so allow them to cool about 5 minutes before removing them from the pans to cool. Makes 2 dozen cookies.

Saturday, June 30, 2012

Pork and Pineapple Kabobs over Wild Rice

This has got to be one of my very favorite dishes I've made in a while! This will be a go to meal many times this summer, for sure. The flavors were awesome! The pork was juicy and tender, mixed with the tanginess of the bbq sauce with the sweetness of the pineapple...mmm mmm! So good! Can't wait to make these again.


Pork and Pineapple Kabobs over Wild Rice

Ingredients:
1 lb. boneless pork loin, cut into 1-inch cubes
1/2 c. barbeque sauce (I used Sweet Baby Ray's)
2 tbsp. dijon mustard
1 tbsp. soy sauce
1 tbsp. olive oil
1/2 tsp. ground black pepper
1 c. pineapple chunks
1 c. green bell pepper chunks
1 6 oz. box wild rice mix, prepared according to package directions

Directions:
Whisk together the barbeque sauce, dijon mustard, soy sauce, olive oil and pepper. Add the pork pieces and toss to coat. Cover and refrigerate and allow to marinate for 2-12 hours. When ready to prepare, heat your grill to medium/high heat. Remove meat from marinade and discard any that's remaining. Thread pork cubes onto skewers alternately with pineapple and peppers. Grill 10-12 minutes, rotating occasionally until meat is fully cooked. Serve over prepared rice. Makes 2-4 servings (depending on how hungry you are! Randy and I ate it all by ourselves)

Sour Cream Enchiladas


This is one of my favorite recipes from the Pioneer Woman. I've made it several times but I never get a chance to snap a picture because they get eaten up so fast! These enchiladas are so simple, but SO flavorful and delicious. I've always made it with low fat or fat free sour cream and they still taste awesome.
After making these several times, I made a couple small changes in the way I do it...nothing major. I just found I didn't need to use as many toritillas. Also, I only use one 10 oz. can enchilada sauce, instead of two like Ree does. I hope you'll make these. And I hope you'll love them as much as we do!


Sour Cream Enchiladas
Ingredients:
10 whole corn tortillas
Canola oil, for frying
1 10 oz. can red enchilada sauce
2 c. low fat sour cream
8 oz. 2% sharp cheddar cheese, grated (about 3 cups)
1/2 c. diced green onions
1/2 tsp. cumin
1/2 tsp. cayenne pepper

Directions:
Preheat oven to 375. Mix together sour cream, green onions half the grated cheddar, cumin and cayenne pepper.
Heat canola oil in a skillet over medium/high heat. Pour the enchilada sauce in a large, deep plate or pie pan. Using tongs, fry tortillas one at a time, for only about five to ten seconds per side (don't allow to crisp.) Remove from oil, then dunk tortilla in enchilada sauce. Lay tortilla on a plate, then spoon a good two or three tablespoons of the sour cream mixture in the middle. Roll tortilla, then place face down in a 9 x 13 inch baking pan. Repeat with remaining tortillas and sour cream mixture.
Cover the dish with any remaining enchilada sauce and the other half of the cheese, then bake, uncovered for 15 to 20 minutes until bubbly.
Serve immediately. Place a dollop of sour cream on each serving, then sprinkle on sliced green onions.

Paprika Chicken Stroganoff


My husband loves anything with the word "stroganoff" in it! I've never been a huge fan, mostly because of the beef and mushrooms...two things I won't eat. But when I came across this recipe, it looked perfect for the both of us! It was fairly simple to make and the end result was delicious! Just the right amount of creamy sauce, not too saltly, and super tasty with the added tomato element. Definitely a keeper!


Paprika Chicken Stroganoff

Ingredients:
1 lb. boneless, skinless chicken breasts, cut into bite-sized pieces
1 tbsp. paprika
1/2 tsp. salt
1/2 tsp. pepper
2 tbsp. all-purpose flour
1 tbsp. olive oil, or more as needed
1 medium yellow onion, diced
2 cloves garlic, finely minced
1 3/4 c. chicken broth
2 tbsp. tomato paste
1/2 cup sour cream
12-16 oz. hot, cooked egg noodles

Directions:
In a medium bowl or large plate, sprinkle the cubed chicken with the paprika, salt and pepper. Sprinkle the flour on top of the chicken and toss to coat.
Heat the olive oil in a large skillet over medium heat until rippling and hot. Add the chicken in a single layer and cook until golden brown on all sides, stirring occasionally, about 5 minutes. The chicken will finish cooking fully a bit later so it doesn’t need to be cooked all the way through. Transfer the chicken onto a plate and set aside.
Add a bit more oil to the pan, if needed, and stir in the onions. Saute, stirring occasionally and scraping up the browned bits from the chicken, until the onion is translucent and lightly browned, about 5 minutes. Add the garlic and cook for another minute, until fragrant.
Pour in about 1/4 cup of the chicken broth and deglaze the pan by scraping up any bits from the bottom. Stir in the tomato paste, whisking to combine. Add the rest of the chicken broth and stir well.
Add the chicken back into the skillet and simmer the mixture over medium-low to medium heat, until the chicken is cooked through and the sauce thickens slightly, about 5-6 minutes. Stir in the sour cream and cook for about 2-3 minutes longer, until thickened. Serve over hot noodles and garnish with fresh parsley, if desired.

Wednesday, June 20, 2012

Espresso Dark Chocolate Coconut Cookies


When I saw this cookie recipe in Annie's blog I pinned it and planned to make them for my dad for Father's Day. I think they were a hit. Just the right amount of chewiness. The coconut and espresso flavors weren't as prominent as I'd hoped. I even added an extra tablespoon of espresso powder...but they were still super tasty!


Espresso Dark Chocolate Coconut Cookies

Ingredients:
3 1/2 c. all-purpose flour
1 tsp. baking soda
1/2 tsp. salt
3 tbsp. espresso powder
1 c. unsalted butter, softened
3/4 c. packed brown sugar
1 c. white sugar
2 eggs
1 tbsp. vanilla extract
1 tsp. coconut extract
1 c. dark chocolate chips
1 c. shredded coconut

Directions:
Preheat oven to 350 and line two cookie sheets with parchment paper and set aside. In a medium bowl, combine the flour, baking soda, salt and espresso powder and set aside. In a large bowl, cream together the butter and sugars until light and fluffy, about 3 minutes. Add the eggs one at a time, beating well after each addition. Blend in the vanilla and coconut extracts. Slowly add all the dry ingredients, beating on low speed, just until combined. Fold in the chocolate chips and coconut.
Using a medium cookie scoop, drop the dough onto the prepared cookie sheets. Bake for 9-11 minutes in the preheated oven just until cookies are set. Let cool on cookie sheets for a few minutes, then transfer to wire racks to cool completely. Makes 3 1/2 dozen cookies.

Monday, June 18, 2012

Homemade Taco Salad Bowls


For Margot's birthday party, we set up a taco salad bar...super easy! You gotta have the taco shell bowls to go with it of course. I decided to make my own. I'm so glad I did! They were really easy and really tasty. The recipes I read said to use empty tin cans to bake them on but I found that using oven-safe bowls worked much much better and gave me the shape I was looking for. I will definitely revisit this one again and again!


Taco Salad Bowls

Ingredients:
10 12-14 inch flour tortillas
1/2-3/4 c. warm water
2-3 tbsp. vegetable oil
Salt to taste

Directions:
Preheat oven to 450 degrees and place 4 oven-safe bowls upside down on 2 cookie sheets. Place a square of aluminum foil over each bowl. Place the warm water and oil in a pizza pan and whisk to combine. Immerse a tortilla into the water mixture and shake any excess off. Drape the tortilla over the foil covered bowl. Repeat with 3 more tortillas and sprinkle lightly with salt. Bake in the preheated oven for 5-6 minutes, until tortilla holds its shape. Using oven mitts, take the tortillas and foil off the bowls with turn the bowls right side up on the cookie sheets. Now, place the par baked shells down inside the bowls and bake an additional 2-3 minutes until crisp and light golden brown. Remove from bowls and cool on racks. You'll have to do this in several batches until you've used all your tortillas. Makes 10 taco salad bowls.

Tuesday, June 5, 2012

If I won an award...

...it would be for "worst blogger".  I have not done well with keeping up with my blog during our move. We've been in our house for 3 weeks and it's not been 4 weeks since my last post. Sorry people. Moving is crazy! And we had sick kiddos on top of it. So I guess I have a pretty good excuse.

After we moved in, Margot got the stomach flu. As soon as she was well, Amelia got the stomach flu. She also got a nasty case of Impetigo on her face...all while working on 6 (yes, 6!) teeth. After the girls were both well, Randy and I traded off watching the girls and working on our other house to get it ready for our tenant. We had endless days of cleaning, painting, weeding etc. But we're done with that now! Our awesome renter moved in Friday and (hopefully) we won't have to worry about that house for a while.

We're mostly unpacked now. we've been working on that in between everything else. And Margot's room is the only one in the house that's mostly the way I want it. My brother and his wife are moving into our upstairs in a couple months, so right now we're mostly focusing on getting it renovated and ready for them. I spent over 20 hours (with the help of some friends and my mom!) in the last 3 days cleaning and painting up there. And then we'll be re-doing to bathroom. I took lots of before pictures and I'll be sure to share the end result with you all!

We are loving out new place. Even though we have lots do to still, we are enjoying all the space! We spend tons of time in our huge, grassy backyard. And we've already had friends over a few times and we're getting ready to celebrate Margot's 3rd birthday here in a couple weeks. It feels like home.

So stick with me as we work to get things done on the house and I'll be sharing lots of pictures as we make progress! Here are a few from my Instagram account...


Amelia playing in her new room


Margot's room


Randy's loving having a backyard to take care of


This is where I can find these two most of the time


Plates I've been collecting from thrift stores and such for the last couple months.
Added a few more to the left side since this picture was taken.

Tuesday, May 8, 2012

1 more week...

...until the big move! This is the reason you haven't seen me around lately. I have been busy sorting, packing, cleaning, labeling, organizing and painting. Oh, and browsing the furniture section on Craigslist a lot. We got some awesome deals! Remember how we live in an 855 square foot home right now? So we don't have much to bring to the new, huge place. Not anymore! Craigslist helped us get an entire living room set (couch, loveseat and chair), a really nice dining table and chairs, a desk and some bar stools. Also, a washer and dryer from the appliance section. Hooray!

Life is a little chaotic right now but I wouldn't have it any other way. We'd move tomorrow if we could! Margot asks me every day "am I move to my new house today, mom?" and I tell her "only 10 more days, 9 more days"...and today I got to tell her, "only 1 more week!" Her face lit up (she has no idea how long 1 week is) and she gasped and said "1 more week?? I'm so excited!". So we're all ready to go :)

I knew next week would be even busier with the actual moving day (the 15th) and then unpacking all week after that. So I spent the whole morning yesterday in the kitchen making some meals to stick in the freezer for us to eat next week. I know I won't be thinking about menu planning, grocery shopping and cooking so I'll be glad I did the work now so I won't have to worry about it next week. This was my first time making freezer meals...I hope I did them right! I made penne with sausage and creamy ricotta, sour cream enchiladas and a chicken pot pie. They all looked like great recipes and they're from some of my favorite blogs and websites. I "healthified" them a little bit by using low fat and whole grain ingredients. I also made my brother a birthday cake for a little family party last night....it was de-licious. Everyone loved it. And one of the simpliest recipes ever! I will definitely make it again.

So, that's a little of what I've been up to! Hopefully I can keep up with posting more during this transition...we'll see what happens!


all my little meals, ready to go into the freezer!


one way to get to the girls to the new house :)


Friday, April 27, 2012

Chewy Coconut Lime Sugar Cookies


So these are probably my new favorite cookie! Super chewy, great flavors, perfect summertime cookie. Not the prettiest picture, sorry! The only change I made to the original recipe is that I doubled the amount of coconut and added an extra egg. I'm glad I did because I think it prevented the cookies from spreading too much like the original recipe says they do. I didn't have trouble with that at all. I can't wait for an excuse to make these again!


Chewy Coconut Lime Sugar Cookies

Ingredients:
2 3/4 c. all-purpose flour
1 tsp baking soda
½ tsp baking powder
½ tsp salt
1 c.butter, softened
1 ½ c. white sugar
2 eggs
½ teaspoon vanilla extract
Zest of one large lime
3 tbsp lime juice
1 c. shredded coconut, toasted*
½ c. sugar (for rolling cookies)

Directions:
Preheat oven to 350 degrees. Line two cookie sheets with parchment paper and set aside. In a small bowl, stir together flour, baking soda, baking powder and salt and set aside. Using a mixer, cream together the butter and sugar until smooth and fluffy. Beat in eggs, vanilla extract, lime juice and lime zest. Gradually blend in the dry ingredients and toasted coconut until fully incorporated. Roll spoonfuls of dough into balls, and roll in sugar until evenly coated. Place on lined cookie sheets about 1 1/2 inches apart. Bake 8 to 10 minutes in the preheated oven, or until lightly browned on the edges and slightly doughy in the centers. Let stand on cookie sheets for a couple minutes before moving to cool on wire racks. Makes 4 dozen cookies.

*to toast coconut just put in an even layer on a cookie sheet and bake at 350 degrees for 5-7 minutes, stirring occasionally. Watch it closely, it goes from white to burnt really quickly!

Sunday, April 15, 2012

It's probably time I tell you...

...we're moving!! Hooray! It's been in the works for several months now but I haven't made the official announcement on my blog yet. So here it is! Just about 6 weeks to go and we'll be out of our little 855 square foot house into more square footage that I have ever dreamed of.

It's got 5 bedrooms, 3 bathrooms, a 2 car garage....my girls will each have their own room! Poor Amelia's been living in our walk in closet since she was born. Works for now! This house is such an enormous blessing and has come at just the most perfect time in our lives.

And the coolest part is that it's the house my husband grew up in. His parents are about to become empty nesters and recently snagged themselves a swanky condo and gave us an awesome deal on their house! I am beyond excited and I have SO many ideas for our new place that I can't wait to get started on. I'm sure I'll be sharing lots of them with you in the near future :)


P.S. This is my 300th post!

Wednesday, April 11, 2012

Nutella Rice Krispie Treats


I made these for Easter this year for the kiddos and my sister who can't have gluten. I think everyone else gave them a try, too! I was happy with how they turned out but I thought they could definitely be more Nutella-y. The hazelnuts and chocolate chips on top are a must!  It gave the that great Nutella flavor. I'll make them again but I'll try 3/4 cup of Nutella instead of 2/3 next time.


Nutella Rice Krispie Treats

Ingredients:
1/4 c. butter (plus more for the pan)
10 oz. bag marshmallows
2/3 c. Nutella
6 c. Rice Krispie cereal
1/2 c. mini chocolate chips
1/2 c. chopped, toasted hazelnuts

Directions:
In a large pot, melt the butter over medium heat. Add marshmallows and stir until melted. Once mixture is smooth, remove from heat and stir in the Nutella. Next, stir the cereal in until well coated. Coat the bottom and sides 13x9 pan with a little bit of softened butter. With butter on your fingers, press the cereal and Nutella mixture into the buttered pan. Sprinkle the hazelnuts and chocolate chips in an even layer all over the top and press firmly with your fingers until they're no longer lose, but attached to the top of the treats. Allow to cool at least 1 hour, cut and serve.

Monday, April 9, 2012

Happy Easter...a day late!


We had a lovely Easter! How about you? My sister, her husband and their three kiddos have been in town for the last week and we've been having a great time with them! We had a big family lunch and egg hunt yesterday. It was a fun, relaxing day.

I wore a dress voluntarily for the first time since my wedding...and heels, too! Randy had a new outfit from Forever21 and the girls both wore ruffly dresses I found them at thrift stores. Don't we all look cute?? ;)

I was in charge of dessert and I made Nutella rice krispie treats (for the kiddos and my sister who can't have gluten) and then a 3-layer carrot cake for everyone else. Recipes coming soon!


Sunday, April 1, 2012

Glazed Bell Peppers and Snap Peas


It's a fact that I'm no good at coming up with side dishes. I usually just throw a salad in with our meal, which isn't a problem at all, but it gets a little routine after a while. This last week I challenged myself to make a new side dish with every meal. This was our favorite one! I found this yummy recipe in my South Beach cookbook. I loved it because it used two of my favorite veggies plus balsamic. Gotta love balsamic! It's really pretty and colorful, too.


Glazed Bell Peppers and Snap Peas

Ingredients:
3 c. snap peas, ends trimmed
1 large red bell pepper, cut into 1-2 inch slices
1/4 c. water
1/3 c. balsamic vinegar
1/2 tsp. Splenda (or 1 tsp. white sugar)
1 tsp. olive oil
1-2 cloves garlic, minced
Salt and pepper to taste

Directions:
Place the snap peas, bell pepper and water into a skillet with a tight fitting lid. Cover and bring to a boil. Boil for 3-5 minutes, or until most of the water is gone and veggies are crisp-tender. Remove the lid and allow any remaining water to evaporate. With the heat over medium, drizzle veggies with the olive oil and add garlic. Saute, stirring occasionally, for 2 minutes., until the garlic is fragrant. Season with salt and pepper.
To make the glaze, combine the vinegar and Splenda in a small saucepan and bring to a boil. Boil, stirring occasionally, for about 3 minutes, until mixture is reduced to 2 tablespoons. Remove from heat and toss with the veggies until evenly coated. Serve hot. Makes 4 servings,

Friday, March 23, 2012

Turkey Taco Peppers


I read a few different Mexican style stuffed pepper recipes and then made this one myself. I wanted to make something that would use up several ingredients I've had lying around for much too long. This did the trick! And they were pretty tasty, too :)


Turkey Taco Peppers

Ingredients:
3 bell peppers
1 small onion, diced
2-3 cloves garlic, minced
1 lb. ground turkey
1 tsp. cumin
1 tsp. chili powder
Salt and pepper to taste
1 tbsp. tomato paste
1/2 c. chicken broth (water would work fine)
1 c. cooked rice or orzo pasta
1/2 c. shredded cheddar cheese

Directions:
Preheat the oven to 350 degrees. Slice the bell peppers in half horizontally and remove all the seeds and white parts. Place, cut side up, in a baking dish. Saute the onion over medium/low heat in a little bit of olive oil. Once they are tender and translucent, add the garlic an saute another 2 minutes. Turn heat up to medium and add the turkey. Cook, breaking it apart as you go, until it is no longer pink. Sprinkle with cumin, chili powder, salt and pepper and stir well. Next, stir in the tomato paste and chicken broth. Bring to a bubble and cook until broth has reduced slightly, about 5-7 minutes. Stir in the rice or orzo and spoon the mixture into the pepper halves. Top each pepper with a pinch of the cheese. Pour half a cup of water into the bottom of the pan. Cover tightly with foil and bake in the preheated oven for 30 minutes. Serve with a dollop of sour cream, if desired. Makes 4-6 servings.

Thursday, March 22, 2012

Skillet Dijon Garlic Chicken


I posted this recipe a while back as one that you bake in the oven. The other day my house was feeling particularly warm so I didn't feel like heating it up even more by turning on the oven. So I decided to throw the chicken along with all the marinade in a skillet and I'm glad I did! This was WAY better than the oven baked version. Plus, as the marinade reduced it made an awesome sauce to serve over the top. I will make it this way from now on!


Skillet Dijon Garlic Chicken

Ingredients:
4 chicken breasts, pounded thin (I cut mine in half horizontally and had 8 pieces)
5 cloves of garlic, minced
1/4 c. dijon mustard
1/4 c. dry white cooking wine
2 tbsp. olive oil
2 tbsp. soy sauce
1 tsp. Sriracha (optional, if you like it a little hot!)
1/4 tsp. ground black pepper

Directions:
Place the chicken in a container with a lid or a gallon size Ziploc bag. In a small mixing bowl, whisk together the remaining ingredients. Pour marinade over the chicken, seal it up and shake around to coat evenly. Place in the fridge to marinade at least 1 hour, or overnight.
After marinading, heat a large skillet over medium heat and add the chicken along with all the marinade. Cook 5-7 minutes on each side, until fully cooked. Served with the marinade spooned over the top chicken breasts. Serves 4.

Wednesday, March 21, 2012

Chai Bars with Honey Ginger Icing


Here is yet another delicious recipe I came across on Pinterest! I love chai and I love an easy dessert to throw together. This is both! I'm embarrassed to say that Randy, Margot and I devoured these all on our own over the last several days. They were awesome! Super moist, too. They had a nice fall taste, almost like pumpkin spice. The blend of spices in these bars is amazing. I figured this could the last dessert like this for a while since yesterday was the first day of Spring ;)


Chai Bars with Honey Ginger Icing

Bar Ingredients:
1/2 c. white sugar
1/2 c. packed brown sugar
1 c. butter, softened
1 egg
2 c. flour
1/2 tsp. salt salt
1 1/2 tsp. ginger
1 1/2 tsp. cinnamon
3/4 tsp. ground cloves
3/4 tsp. cardamom (I didn't have)
1/4 tsp. black pepper
1/4 tsp. ground nutmeg

Icing Ingredients:
2 tbsp. honey
1 tsp. ginger
1 c. powdered sugar
water


Directions:
Preheat oven to 350 degrees. Grease a 9x13 baking pan and set aside. In a large mixing bowl, cream together the butter, white sugar and brown sugar. Add the egg and mix well. In a separate bowl, combine the flour, salt and spices and stir into the butter mixture until thoroughly combined. Spread the batter into the prepared pan. Bake for 20 minutes, until the cookies are a light golden brown. Let cool.
To make the icing: mix the honey, ginger, and powdered sugar in a small bowl. Add water, half a teaspoon at a time, until the icing is spreadable. Spread over the cookies and allow to set before cutting into squares.

Monday, March 19, 2012

Deconstructed Eggplant Parmesan - Meatless Monday


This is a recipe I've had flagged for a long time! Don't know it took me so long to try it out. I think eggplant intimidates me a little bit. There's a fine line between it being too bitter and tough and too mushy and flavorless. Sauteing it in small pieces was a great way to gauge it. This dish was fresh and tasty, loaded with flavor. 

It made a lot which was great for leftovers. The original recipe says this feeds 4. I'd say it serves 6-8, easy! There were a few little changes I made based on the ingredients I had on hand. If you're a eggplant parm lover, this is a simple, delicious, less messy way to enjoy it!

Recipe found here


Deconstructed Eggplant Parmesan

Ingredients:
2 tbsp. olive oil
1 medium eggplant, cut into 1-inch cubes
1 medium onion, diced
2 garlic cloves, minced
1/4 teaspoon crushed red pepper flakes
2 c. marinara sauce
1 c. water
1 lb. rigatoni or penne
10 basil leaves, torn
1/2 lb chopped fresh mozzarella (I had shredded I needed to use)
1/4 c. panko breadcrumbs
1/4 c. grated Parmesan

Directions:
Bring a large pot of salted water to boil. In the meantime, set a large skillet over medium-high heat, and add olive oil. Add the eggplant, onion, and 1 teaspoon salt and sautƩ, stirring occasionally, for 10 minutes, until the eggplant is tender. Add the garlic and red pepper flakes and cook until fragrant, about 2 more minutes.
Pour the marinara and water over the eggplant mixture and stir to combine. Simmer gently until the the eggplant is soft and just barely falling apart, about 10 minutes. Taste for seasoning and add more salt if necessary.
In a small skillet pan, toast the breadcrumbs with a little bit of olive oil until golden brown, about 3 minutes. Set aside. Cook the pasta according to package directions until al dente. Drain and add to the pan with the sauce. Add the basil leaves (reserving one or two for garnish) and the mozzarella and toss to combine.
Spoon the pasta into serving bowls and top each with a tablespoon of breadcrumbs and Parmesan. Garnish with torn basil leaves, and serve immediately.

Sunday, March 18, 2012

Irish Cream Bundt Cake


I was in charge of dessert this year for our family's St. Patrick's Day meal. I came across this recipe on allrecipes.com and it had great reviews and looked easy to make so I decided to give it a try! Baileys is some good stuff...especially in dessert form! This cake was awesome! Super moist, super flavorful and it had a great texture. Everyone loved it. I think Randy is going to request this cake a lot from now on...not just for St. Patrick's Day! The original recipe called for using a bundt pan but I suggest using an angel food pan. I think it bakes more even and makes the cake look better :)


Irish Cream Bundt Cake

Ingredients:
1 c. chopped pecans
18.25 oz. package yellow cake mix
3.4 oz package instant vanilla pudding mix
4 eggs
1/4 c. water
1/2 c. vegetable oil
3/4 c. Irish cream liqueur
1/2 c. butter
1/4 c. water
1 c. white sugar
1/2 tsp. salt
1/4 c. Irish cream liqueur

Directions:
Preheat  oven to 325 degrees. Grease and flour an angel food cake pan and sprinkle the chopped pecans evenly in the bottom and set aside. In a large mixing bowl, combine cake mix and vanilla pudding mix. Add the eggs, 1/4 cup water, vegetable oil and 3/4 cup liqueur. Mix on high for 2 minutes. Pour batter into the prepared pan, on top of the nuts. Bake in the preheated oven for 1 hour, until toothpick inserted in the center comes out clean.
Cool for 10 minutes in the pan. While cake is cooling, make the glaze. In a small saucepan, combine the butter, 1/4 cup water, sugar and salt and bring to a boil. Boil and stir constantly for 5 minutes. Remove from heat and stir in 1/4 cup of liqueur. After cake has cooled for 10 minutes, gently remove from and pan and place on a serving platter, pecan side down. Poke holes all over the top of the cake with a fork and spoon half the glaze all over the top and sides of the cake, allow it to absorb and then spoon the second half of the glaze. Serves 10-12.


Tuesday, March 13, 2012

Teriyaki Meatball Bowls

Yum, yum, YUM! This dish was so good! I pinned it awhile back and finally got around to making it. The recipe originally came from an awesome blog called Budget Bytes. I've made several of her dishes and they never disappoint. I made a few minor changes, but followed the recipe for the most part. And don't be intimidated by the long list of ingredients! This was relatively easy to make. I would've never thought you could have meatballs with Asian food but this totally works!


Teriyaki Meatball Bowls

Meatball Ingredients:
1 lb. ground turkey, chicken or pork (I used turkey)
1 egg
1/2 c. plaid breadcrumbs (I used whole wheat)
2 garlic cloves, minced
2 inches fresh ginger, peeled and minced*
1 tbsp. soy sauce
2 green onions, sliced
Black pepper to taste

Glaze Ingredients:
1/2 c. low sodium soy sauce
1/2 c. brown sugar
1/2 c. water
2 inches fresh ginger, peeled and minced*
1 clove garlic, minced
2 tbsp. corn starch
1/4 c. cold water
1 tbsp. sesame seeds

Rice Bowl Ingredients:
2 c. long grain brown rice (the original recipe calls for jasmine rice)
4 c. water
1 tsp. salt
2 green onions, sliced


Directions:
Preheat oven to 400 degrees and cover a cookie sheet in foil and set aside. Place the meat in a mixing bowl and add the remaining seven ingredients. Mix until well combined. Using your hands works best! Roll into 1 inch balls and place on the prepared sheet as you go. You should get about 30 meatballs. Bake in the preheated oven for 30-35 minutes, until fully cooked.

While the meatballs are in the oven, prepare the rice according to package directions; place rice, water and salt in a large pot with a lid. Bring to a boil and then reduce to a simmer. Cover and simmer 45 minutes, or until all the water is absorbed and rice is fluffy.

While the meatballs and rice are cooking, prepare the glaze. In a medium saucepan, combine the soy sauce, brown sugar and water. Stir over low heat just until brown sugar has dissolved. Stir in the ginger and garlic and turn to med/high heat and bring to a bubble. Dissolve the corn starch in the cold water and stir into the soy mixture until thickened. Stir in the sesame seeds.

When the meatballs are cooked, remove them from the pan and place them in the saucepan with the glaze. Stir to coat. To build the bowls, place 1 cup of rice in a bowl, top with 5 meatballs and drizzle with some glaze. Sprinkle with green onions and serve immediately. Makes 6 bowls.


*I found the easiest way to "mince" ginger is by using the small holes of a cheese grater. This works great for garlic cloves too!

Monday, March 12, 2012

Vanilla Pudding Chocolate Chip Cookies (aka the only cookie recipe you'll ever need)


I'm not kidding when I say this is the only choc. chip cookie recipe you'll ever need! Ever.
I thought I had made some really good ones before but they don't even compare to these! Something about the vanilla pudding gives these cookies an amazing soft and chewy texture and kicks the flavor up a couple notches!
I made these years ago and then lost the recipe and then my cousin posted this recipe on Pinterest and I HAD to make them again. The recipe made 8 dozen cookies (yikes!) so I made a few adjustments and ended up with 3 dozen instead. Perfect :)


Vanilla Pudding Chocolate Chip Cookies

Ingredients:
2 1/4 c. all purpose flour
1 tsp. baking soda
1/2 tsp. salt
3/4 c. packed brown sugar
1/4 c. white sugar
1 tbsp. vanilla extract
1 c. unsalted butter, softened
2 eggs
3.4 oz. box instant vanilla pudding mix
2 c. semi sweet chocolate chips (12 oz. package)

Directions:
Preheat oven to 350 and grease a couple cookie sheets and set aside. Sift together the flour, baking soda and salt in a small mixing bowl and set aside. In a separate mixing bowl, cream together the sugars, butter and vanilla. Add eggs, one at at time and then add the vanilla pudding mix. Next, add the flour mixture into the butter mixture 1/2 cup at a time until well combined. Mix in the chocolate chips and drop by rounded tablespoonfuls onto the prepared cookie sheets. Bake in the preheated oven for 10-12 minutes, until very lightly browned on the edges. Remove from the sheets and cool on cookie racks. Makes 3 dozen.

Fabric Scrap TuTu


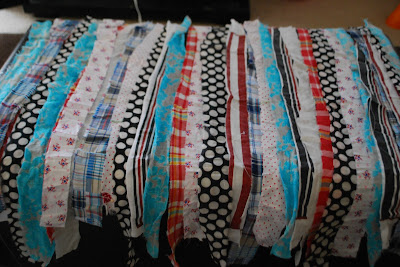
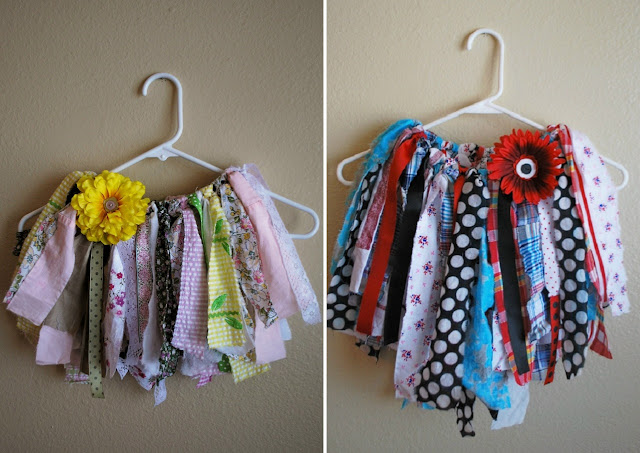
So Margot's latest obsession is tutus. The first thing she asks for in the morning (before going potty or eating breakfast) is to put on a tutu. She has two that we rotate and wash all the time so I thought it would be good to add a couple more to her collection. I came across this tutorial on Pinterest and thought it was adorable and super do-able.


All you need for the easy project is....

-Fabric scraps (I used 35-40 per tutu)
-1/2 inch wide elastic band, sewn according to your child's waist size (I used pre-made elastic headbands...they were the perfect size! About 18 inches)
-Scissors or pinking shears (to cut fabric)
-Ribbon, tulle, silk flowers (optional)


Step 1: Cut your fabric into strips. I made two tutus and for one I made the strips 21-26 inches long. For the other they were 25-33 inches long. I made the strips 1-2 inches wide for both. I made them different sizes on purpose to add more character. I also used some coordinating ribbon and a flower for each. You can do whatever colors you want!


Step 2: Lay your fabric strips out to decide what order you want them in. This is an optional step but it helped me visualize what the tutu would look like. I wanted it to be randomly planned :)


Step 3: I found it easiest to place the elastic band around my knee to work with. Loosely tie each fabric strip to the band, making a double knot. It's as easy as that! This only took me about 5 minutes to complete.


Step 4: Once you're finished with the fabric strips, feel free to add some ribbon and/or tulle as well. Trim up the longer ends so they're all the same general length. I also added a flower to each of mine. I just sewed them through one of the fabric strips onto the elastic band. And you're done!


Aren't they adorable?? Margot absolutely loves them! She loves to twirl and dance in them. So fun! I'll have to post some pictures of her later :) Enjoy!


-ChloƩ

Tuesday, February 21, 2012

Classic Alfredo Sauce


This stuff is soooo very sinful but we wanted to make something special on Valentine's Day that we both love and that we don't normally eat. This was perfect! Great for the special occasion. Plus it was really easy to make. I didn't think to take a picture of it, but here's one that Randy snapped when we were eating dinner :)


Classic Alfredo Sauce (adapted from here)

Ingredients:
1/4 c. butter
1 c. heavy cream
1 clove garlic, minced
1 1/2 c. freshly shredded parmesan cheese

Directions:
Melt the butter in a small saucepan and add the cream and garlic. Stir to combine and bring to a simmer. Simmer for 5 minutes. Next, whisk in the cheese until completely melted and smooth. Serves 4.

Thursday, February 9, 2012

Chocolate Coconut M&M Cookies


It's been a while since I've make cookies, especially chocolate cookies...my husbands favorite! My brother gave me several bags of coconut M&Ms (so good!) so I decided to make cookies with them. I'm so glad i did! These cookies are amazing. Coconut+Chocolate is an amazing combo! If you can find coconut M&Ms, you gotta make these!


Chocolate Coconut M&M Cookies

Ingredients:
2 c. all purpose flour
2/3 c. cocoa powder
3/4 tsp. baking soda
1/2 tsp. salt
1 1/2 c. sugar
1 tsp. vanilla extract
1 tsp. coconut extract
1 c. butter or margarine, softened
2 eggs
1 c. chopped coconut M&Ms
3/4 c. flaked coconut

Directions:
Preheat oven to 350 degrees, grease a couple cookie sheets and set aside. Combine the flour, cocoa powder, baking soda and salt in a small bowl and set aside. In a separate mixing bowl, cream together the sugar, extracts, eggs and butter until smooth. Add the dry ingredients to the butter mixture, half a cup at a time and mix thoroughly after each addition. Once all the dry ingredients are incorporated, mix in the M&Ms and flaked coconut. Drop by rounded tablespoonfuls onto prepared cookie sheets. Bake in preheated oven for 8-10 minutes and then transfer onto cooling racks. Makes about 3 dozen cookies

Monday, February 6, 2012

Meatless Monday - Tomato Basil Soup with Ricotta Dumplings


Yum, yum, yum, yum, yum! I got this recipe out of my Pampered Chef vegetarian cookbook and it did not disappoint! This soup was loaded with flavor and really easy to make! It only makes two servings so next time, I'm definitely doubling it.


Tomato Basil Soup with Ricotta Dumplings

Soup Ingredients:
1 tsp. olive oil
2 garlic cloves, minced
1 15 oz. can crushed tomatoes, undrained
1 1/2 c. vegetable broth
1/4 c. fresh basil leaves, chiffonade

Dumpling Ingredients:
1/4 c. part skim ricotta cheese
2 tbsp. grated parmesan cheese
1 egg white
Salt and pepper to taste
1/3 c. all purpose flour


Directions:
Heat the oil in a medium saucepan and add the garlic. Saute for 1-2 minutes, until very fragrant and lightly browned. Immediately add tomatoes, broth and basil. Stir and bring to a boil. Reduce heat and simmer for 8-10 minutes.
Meanwhile, combine all the dumpling ingredients and shape into 8-10 small round balls. After soup has simmered, return to a boil and add prepared dumplings. Boil until dumplings float to the surface, about 3-5 minutes. Ladle soup into two bowls and top with additional basil and cheese if desired.

Thursday, February 2, 2012

Pan-fried Pork Tenderloin with Spicy Mustard Sauce


Here is yet another tasty dish from Kalyn's Kitchen. I'm becoming a fan of cooking with tenderloin! Especially if I can find it on sale ;) It's moist, flavorful, fairly lean, versatile and really easy to work with. This recipe was absolutely delicious! I love spicy mustard so I figured this was gonna be good. And it was!


Pan-fried Pork Tenderloin with Spicy Mustard Sauce

Ingredients:
2 lb. pork tenderloin, trimmed of any visible fat
Salt and pepper to taste
2 tbsp. olive oil
2 tbsp. fat free chicken broth (you could also use water)
1/3 c. spicy brown mustard
3 tbsp. dijon mustard
3 tbsp. low fat sour cream

Directions:
In a large skillet,  heat the oil over medium heat. Season pork with salt and pepper and place it in the hot skillet. Cook, turning occasionally until the meat is golden brown on all sides, about 8-10 minutes. Once the meat is browned, turn the heat to low and cover. Cook covered for 20-25 minutes, until cooked through.
Remove the pork from the pan, allow to rest and cover it tightly with foil to keep warm.  Leave any drippings in the pan and turn heat back to medium. Whisk in the chicken broth, scrapping the bottom and sides of the pan. Bring to a bubble and whisk in the mustards and sour cream. Cook and stir until heated through.
Once you've allowed the meat to rest for 10 minutes, slice into 3/4 inch slices and spoon the mustard sauce over the top. Makes 4-6 servings.