"Sometimes I wonder about my life. I lead a small life - well, valuable, but small - and sometimes I wonder, do I do it because I like it, or because I haven't been brave?" - Kathleen Kelly (You've Got Mail)

Sunday, November 28, 2010

Lemon Bars

Crust Ingredients:
1 c. butter, softened
1/2 c. white sugar
2 c. white flour
1/2 tsp. salt

Filling Ingredients:
1 1/2 c. white sugar
1/4 c. white flour
4 eggs
2/3 c. lemon juice
Zest of 1 lemon
5 drops yellow food coloring (optional)
1/4 c. powdered sugar

Crust Directions:
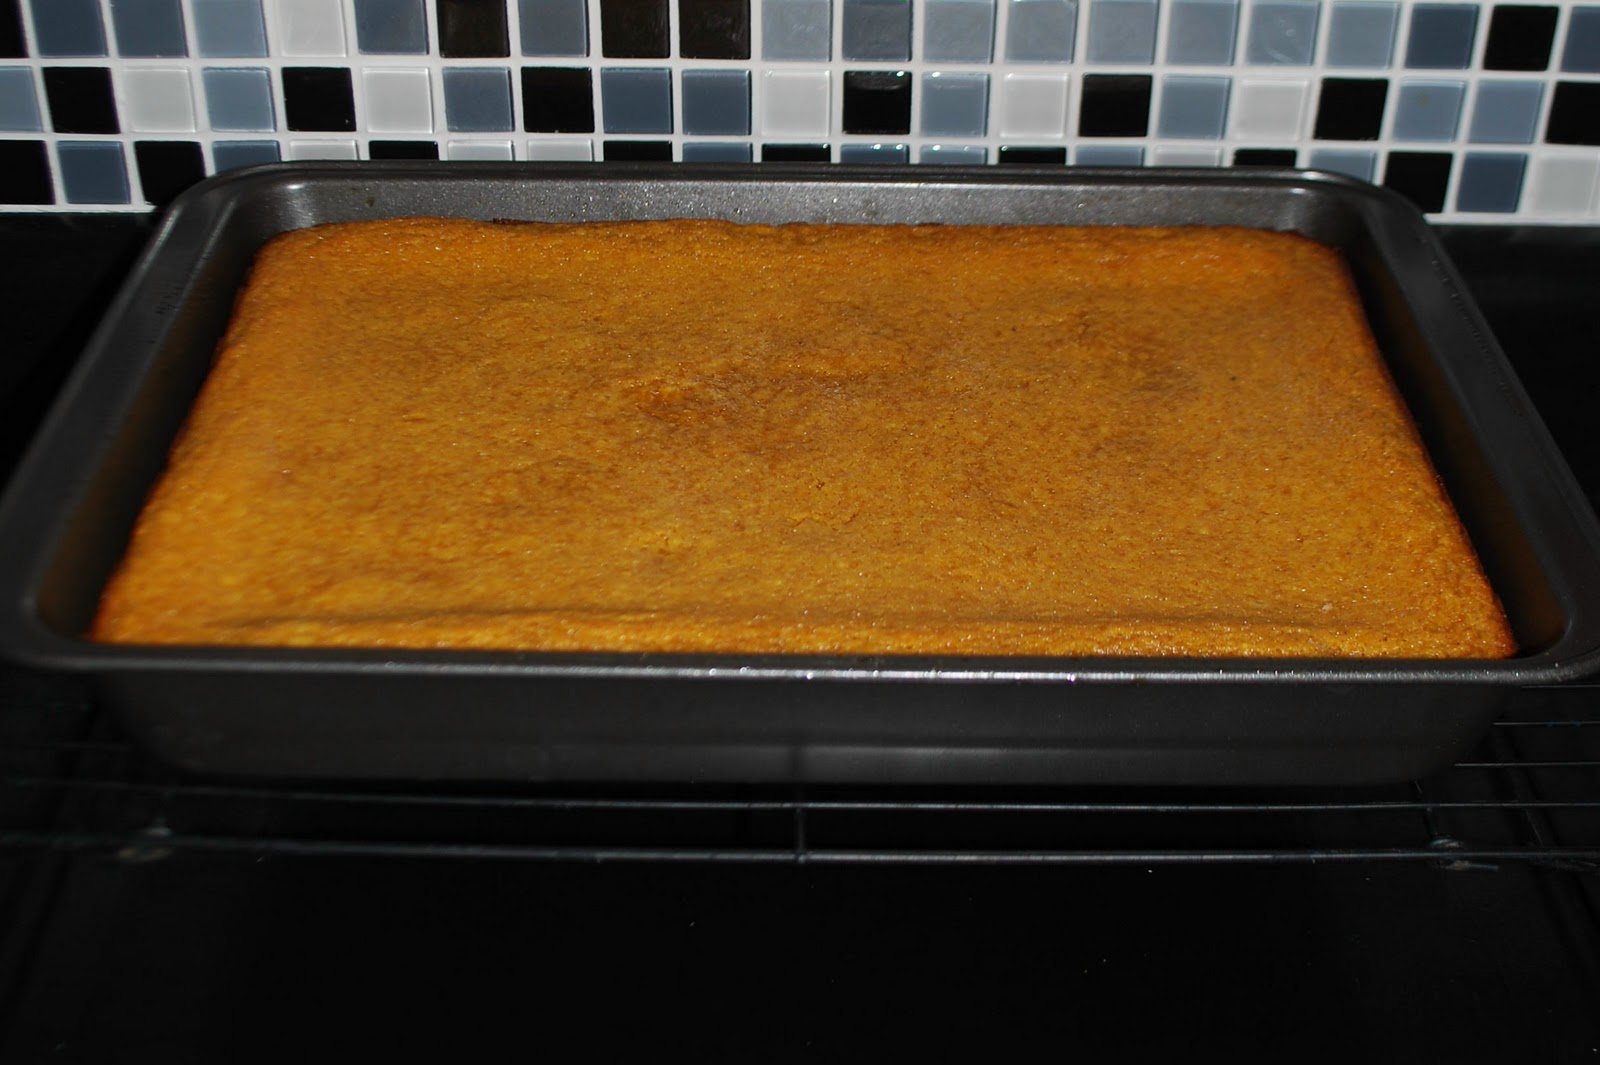
Preheat oven to 350 and lightly grease a 13x9 pan and set aside. Beat together the 4 crust ingredients until dough forms. Using your fingers or the back of a spoon, press dough evenly into the prepared dish and bake in the preheated oven for 15 minutes. 

Filling Directions:
While crust is baking, whisk together the sugar and flour. Add the eggs, lemon juice, lemon zest and food coloring if using. Stir until well combined. Once crust has finished baking, pour the filling over the top (will be very thin) and bake for an additional 20 minutes or until light golden brown on top. Place powdered sugar in a sifted and dust the top of the bars evenly while cooling. Cool completely, slice and serve. You can serve room temperature or refrigerate. Makes 24 bars.


Notes: These bars have always reminded me of my older sister. She used to make them all the time when we were kids and I never tried them because I didn't think I'd like them (I used to be really picky!). I thought of them today for some reason, maybe because my sister was on my mind, and I decided to give them a try! I'm sorry that I never tried them before...they are delicious! Very sweet and tart...but delicious!

PS-all the bars got eaten before I got a chance to take a picture of them, so I borrowed this one from Google images until next time I make them!

Wednesday, November 24, 2010

Gooey Pumpkin Butter Cake

Cake Ingredients:
18.25 oz. yellow cake mix
1 egg
1/2 c. butter, melted


Filling Ingredients:
8 oz. cream cheese, softened
15 oz. can pumpkin puree
3 eggs
1 tsp. vanilla
1/2 c. butter, melted
16 oz. powdered sugar
1 tsp. cinnamon
1 tsp. nutmeg


Cake Directions:
Preheat oven to 350 and grease a 13x9 baking dish and set aside. Combine the cake mix, egg and butter and mix until well combined. Press evenly into the prepared baking dish and set aside.


Filling and Baking Directions:
In a large bowl, beat cream cheese and pumpkin until smooth. Add the eggs, vanilla, butter and beat until combined. Next, add the powdered sugar, cinnamon and nutmeg and mix well. Pour mixture over the cake batter (mixture will be thin) and bake 40-50 minutes. Do not over bake, the center should be a little gooey. Makes 12-15 squares.


Notes: I made this cake for Thanksgiving a couple years ago and it was a hit! I made again for an event at our church this evening. This is a Paula Dean recipe so you know it can't be good for you at all ;) But it's SO good! It's like a cross between pumpkin pie, custard and cheese cake with a really yummy, buttery crust. It's especially tasty with whipped cream and coffee.

Friday, November 12, 2010

Coffee Cake

Cake Ingredients:
2 c. flour
3/4 white sugar
2 tsp. baking powder
1 tsp. cinnamon
1/2 tsp. salt
1/2 c. chilled butter
1 egg
about 3/4 c. milk
1 1/2 tsp. vanilla

Streusel Ingredients:
1/3 c. flour
1/3 c. white sugar
1/3 c. brown sugar
1 tsp. cinnamon
1/4 c. chilled butter


Cake Directions: 
Preheat oven to 350 and grease a 9x9 baking dish and set aside. In a large bowl, combine the flour, sugar, baking powder, cinnamon and salt. Cut in the butter until mixture is crumbly. Crack the egg into a 1 cup measuring cup and bet lightly. Fill the rest of the cup with milk and then add the vanilla. Stir well to combine. Add the milk mixture to the flour mixture and mix just until moistened. Do not over mix!

Streusel and Baking Directions:
In a medium bowl, combine the flour, sugars and cinnamon. Cut in the butter until mixture is crumbly. To assemble, spread half the cake batter into the prepared pan, followed by half the streusel. Repeat these steps with the remaining batter and streusel. Bake in the preheated oven for 30-35 minutes or until cake is set. Makes 9 generous servings.


Notes: I'm not usually a very big fan of coffee cake but for some reason I was craving it last night so I threw this together for dessert. I'm so glad I did! It's probably the best tasting, fluffiest, most moist coffee cake I've ever had! And it was SO easy! I will make this again for sure :)

Thursday, November 11, 2010

Earring Holder(s)

I have many many pairs of earrings that have been stored in the bottom of my jewelry box for years! I hardly ever wear them because I never think about it...out of sight, out of mind! I recently went to a jewelry party and purchased a fun pair of gold tear drop earrings and then got a few more pair at the store that I found on clearance and I've been having so much fun wearing them! They reminded me of all the earrings I had hidden away. Last night I got them all out and looked at them and decided I needed to have them out where I can see them so I'll wear them more often. Then I looked up at the empty space on the wall next to our bed (I've been trying to find something to hang there since we set up our room!) and I had an ah-ha moment! I decided to make an earring holder to go on that wall. I took a trip to Hobby Lobby and got all my supplies.

Here is my blank wall:


Here are all all my dangly earrings:


So now I'll give you step by step instructions in case you want to make an earring holder, too! They were super easy and lots of fun to make and the possibilities are endless when making one of these!

Supplies:
Picture frames of any size or color (I used 3 black 8x10's)
Paper to line the back of frames (I used cream and black)
Ribbon (I used red, cream an black)
Glue stick or double sided tape
Scissors
Pencil
Hot glue gun 
...ignore the buttons in the picture, I didn't end up using them!


1. Take the frames apart. You won't need the glass so you can throw it away. Lay the backs of the frames on top of your paper and trace along the sides with a pencil and then cut along the lines.


2. Next, put glue or double sided tape on the backs of the paper and firmly attach to the backs of the frames. Here are mine:


3. Now you will need to cut ribbon, Make sure it hangs over the sides at least 1 inch. Choose how far apart you want your ribbons depending on the length of your earrings. Secure each ribbon with a very small dot of hot glue right in the center.


4. Flip over and place a 1 inch line of hot glue on the back where you are going to put the ribbon. Pull tight and press down until dry. 
This is what the back should look like when you're done gluing the ribbons down. Cut any extra ribbon off.


6. Put the backs into the frames and secure like you would if you were putting photo in it. Here's how my 3 turned out:


7.Hang on the wall or set up on your dresser or night stand and hang your earrings on the ribbons.


Here are some more photos of the holders I made with my earrings in them:

No more blank wall!


I am so happy with how these turned out! They were exactly what I had in mind! Now hopefully I won't leave the house without earrings on anymore :)

Wednesday, November 10, 2010

Vegetarian Fajitas

Ingredients:
1/4 c. olive oil
1/4 c. red wine vinegar
2 tbsp. lime juice
1 tsp. dried oregano
1 tsp. chili powder
1 tsp. cumin
1 tsp. garlic powder
1 tsp. white sugar
Salt and pepper to taste
2 small zucchini, julienned
2 small summer squash, julienned
1 large onion, thinly sliced
1 green bell pepper, thinly sliced
1 red bell pepper, thinly sliced
8.75 oz. can corn
15 oz. can black beans, drained and rinsed


Directions:
In a large bowl with a lid, whisk together olive oil, vinegar, lime juice, oregano, chili powder, cumin, garlic powder, sugar, salt and pepper. To the bowl, add the zucchini, squash, onion and bell peppers. Cover with lid and marinade in the fridge for 30 minutes or up to 24 hours.I marinaded mine for 5 hours.
In a large skillet, over medium/high heat, place all the vegetables with the about half of the marinade and saute until tender, about 15 minutes. Next, add the corn and beans and saute another 5-10 minutes over high heat until lightly browned. Serve in whole wheat tortillas by itself or with your favorite toppings. Makes 6 servings.


Here are the veggies all marinaded and ready to go into the fridge:


Here they are after, ready to be eaten!


Notes: I found this recipe here and I knew I had to try it! I made a few changes, but overall I stuck to the original recipe. It's actually a vegan recipe but we added sour cream and cheese as toppings so now it's just vegetarian! It was really yummy and flavorful.

New Bible!

I am beyond excited about this...so much so that I had to dedicate an entire post in my blog to it :)

I have two trusty Bible's already and I will show them to you below. One of them I got back in 2000, the summer after I turned 13. When I turned 18 I decided I needed a more "grown up" looking Bible so my parents got me a small black leather one with my soon to be married name "Chloe Bowen" on the front in gold letters. So let me introduce you to these two Bibles...


Here's Bible #1 from 2000:


It is filled with doodles, stickers, notes to my friends, tons of highlighted pages, etc. This Bible and I have had some great times! But notice it's TEEN Bible...those years are long gone!


Here's the first page when you open it up. My "Gramma" bought this for my from her book store in Nebraska City...


I still read this Bible almost every day. It's cool to look back and see verses I highlighted over 10 years ago. I just feel it's time to move on! I will probably keep this Bible around for Margot to check out when she's a teen. Yikes! That's a scary thought.


Here's Bible #2 from 2005:


This WAS a really nice little Bible! A couple weeks after my husband and I got our beagle, this became a chew toy for an afternoon. I came home to black leather shreds and pieces of paper all over the living room. That was not a happy day.


I've been doing my best to continue using this Bible and this is what I usually keep in my purse and it comes to church with me. But every once in a while I'll come across a page like this...sad!


About a year ago I was sitting next to my friend Jessica in church and she had this brand new, beautiful "journal Bible" and I fell in love! A journal Bible has 2 inch margins on either side of the pages for taking notes. I've been wanting one ever since! A couple Sundays ago I saw that our pastors wife had a super cute green and blue one and that caused me to do some shopping!

I came across this awesome brown, cream and gold once with a floral pattern. It was usually $69.99 and it was on sale for $35.99. Needless to say...I bought it! Here it is:


Isn't it pretty??


It's a really nice size and has a hard cover :) 


I just love it!


 And here's what the inside looks like...see what I mean about the places for taking notes? Or journaling...


I can't wait to start using it!

Tuesday, November 9, 2010

Corn Pudding in Acorn Squash

Ingredients:
1 2 lb. acorn squash, halved lengthwise and seeded
1 tbsp. butter, softened
3/4 c. milk
2 eggs, beaten
1 c. corn kernels
Salt and pepper to taste
1/4 c. chopped green onions
3/4 c. shredded sharp cheddar cheese

Directions:
Preheat the oven to 375. Rub half the butter on each acorn squash half and bake cut side up in the preheated oven for 40 minutes or until tender. In a mixing bowl, combine milk, eggs, corn, salt, pepper, 1/2 the green onions and 1/2 cup cheese. Pour into the baked squash until completely full. Bake in the 375 degree oven for an additional 40 minutes or until corn pudding is set. Sprinkle with remaining onions and cheese and place under the broiler until cheese is melted and bubbly. Serves 2.


Notes: WOW! This is one of the most incredible things I've tasted! With every single bite, Randy and I were oohing and ahhing. PLEASE make this. You won't be sorry! It was super easy and the flavors were absolutely amazing! I can't say enough good things about this dish.

Monday, November 8, 2010

Pasta e Fagioli

Ingredients: 
2 tbsp. olive oil
1 small or medium onion, diced
3-4 carrots, diced
4-5 celery stalks, diced
4 garlic cloves, minced
28 oz. can diced tomatoes
15 oz. can red kidney beans, drained and rinsed
15 oz. can white cannelini beans, drained and rinsed
64 oz. vegetable broth
28 oz. can tomato sauce
2 tsp. dried parsley
1 tsp. dried basil
Salt and pepper to taste
6 oz. small dried pasta (I used Campanelle)

Directions:
In a large saucepan over medium, heat the olive oil and add the onion, carrots, celery and garlic. Saute for 10-15 minutes, stirring occasionally. Add the can of diced tomatoes (undrained) and stir. Turn the heat to medium/high and simmer for 10 minutes.
Next, add the beans, vegetable broth, tomato sauce, parsley, basil, salt and pepper and stir well to combine. Turn the heat all the way up and bring to a boil. Once boiling hard, reduce to a simmer and cover. Simmer with the lid on for 35-40 minutes or until vegetables are soft. Remove the lid, return to a boil and add pasta. Boil for 10-15 minutes, until pasta is done to your liking. Serves 8.


Notes: Pasta e fagioli means "pasta and beans" in Italian and it's a delicious vegetarian soup! I love fall and winter because I get to make soup once or twice a week and I will definitely make this one again! The beans add some extra protein, which I love :)

Friday, November 5, 2010

3 Ingredient Peanut Butter Cookies

Ingredients:
1 c. peanut butter
1 c. sugar
1 egg

Directions:
Preheat oven to 350 and line 2 cookie sheets with parchment paper and set aside. Combine all 3 ingredients and mix until smooth, about 30 seconds. Drop by rounded spoonfuls onto prepared cookie sheets. Using the bottom of a glass, flatten the cookies slightly. Bake in the preheated oven for 6-8 minutes, or until edges are golden brown and cookies are still soft in the center. Don't over bake or cookies will be dry and crumbly. Transfer to wire racks and cool. Makes 24-30 cookies.


Notes: These are (obviously!) super simple to make and they are delicious as well! I think I might like them better than regular peanut butter cookies because the PB flavor is more intense. These are also gluten free which is a big plus for some people :)

Thursday, November 4, 2010

Bean and Cheese Enchiladas

Ingredients:
1 tbsp. olive oil
1 small or medium onion, chopped
15 oz. can black beans, drained and rinsed
15 oz. can pinto beans, drained and rinsed
1 tsp. chili powder
1 tsp. garlic powder
1/2 tsp. cumin
1 tsp. salt (or to taste)
1/2 tsp. black pepper
2 8 oz. cans tomato sauce
10 oz. can red enchilada sauce
8 oz. shredded monterrey jack cheese
8 10 in. whole wheat flour tortillas

Directions:
Preheat the oven to 350. Heat the oil in a large skillet over medium heat. Add the onion and saute until tender. Meanwhile, place beans and all spices and seasonings in a large bowl and mash roughly, leaving some of the beans whole is fine then stir in 1 can of the tomato sauce. Once onions are tender, add the bean mixture to the skillet and cook until hot and bubbly.
Combine the enchilada sauce and the remaining can of tomato sauce and spread enough in a 13x9 baking dish, just to coat the bottom. Next, spread the bean mixture evenly into each tortilla and top each with a large pinch of cheese. Roll up tightly and line up in the prepared baking dish. Once all the enchiladas are in the pan, spread with the remaining enchilada sauce mixture and sprinkle with the rest of the cheese. Bake in the preheated oven for 30 minutes. Serves 4.


Notes: I have made many kinds of enchiladas in my day but this is hands down, my favorite recipe! The ingredients are fairly simple so I wasn't expecting much but these things were packed with flavor and moisture! Y-U-M!

Pumpkin Spice French Toast

Ingredients:
8 slices french bread (I used whole wheat)
3 eggs
1/3 c. pumpkin puree
3 tbsp. milk
1 tsp. pumpkin pie spice
1/2 tsp. cinnamon
1/2 tsp. vanilla extract
Butter for cooking 

Directions:
in a medium bowl, whisk together the eggs, pumpkin puree, milk, pumpkin pie spice, cinnamon and vanilla for about a minute. In a medium or large skillet, melt a little butter over medium/high heat and allow the pan to get nice an hot. Dip each piece of bread in the pumpkin mixture, flipping to coat both sides well. Place in the hot skillet and cook for about 3 minutes or until lightly brown. Serve hot with maple syrup over the top. Makes 3-4 servings.


Notes: Man, this stuff was amazing! I was hungry late last night and I threw this together and was really happy with how it turned out. French toast is my all time favorite breakfast food and adding pumpkin to it makes it even better :)